

How To Map And Dose The Upper Face With BOTOX® Cosmetic
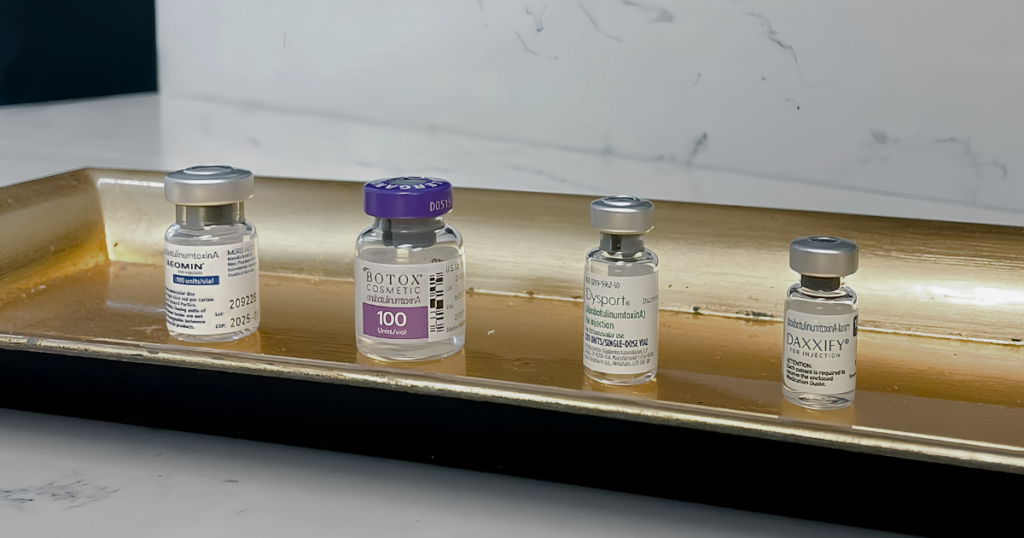
Understanding the labeled framework and knowing when the clinical map should look different.
On label dosing provides new injectors with an important, research backed framework. However, it does not replace a thorough assessment. The number of injection points, their placement, and the total dose used in practice may look very different from the labeled pattern because the goal is to treat the patient’s muscle, not copy a diagram.
Throughout this article, we will compare FDA approved BOTOX Cosmetic dosing with the assessment led techniques and clinical pearls Lindsay Olyha, CRNP teaches inside Aesthetic Pro Academy.
On Label Dosing is a Reference Point, Not a Prescription For Every Face
When learning neuromodulators, new injectors need to understand the FDA-approved BOTOX Cosmetic patterns. These patterns establish studied doses and standardized injection points:
• 20 Units across five glabellar injection sites
• 20 Units across five frontalis injection sites when treated with the glabella
• 24 Units across six lateral canthal injection sites
New injectors should know these patterns and understand the evidence behind them. But the label only provides the starting point.
Clinical trials use standardized patterns to create consistency. Real patients require individualized treatment plans. Muscle mass, forehead height, brow position, compensatory movement, asymmetry, sex, previous treatments, desired movement, and individual risk factors can all change how you approach treatment.
In clinical practice, an experienced injector may use fewer units per point, adjust the number of injection points, or use a completely different pattern from the labeled map.
One of the principles taught at Aesthetic Pro Academy is to begin conservatively when appropriate and build upward when the patient’s assessment and response support additional treatment. This allows the injector to evaluate the patient’s individual response instead of automatically treating every patient with the same dose and pattern.
All dosing discussed in this article is expressed in onabotulinumtoxinA, or BOTOX Cosmetic, Units. Neuromodulator units are product specific and cannot be directly converted across products. Techniques that differ from approved labeling should be recognized as off label and supported by appropriate training, informed consent, documentation, and clinical judgment.
Begin With A Dynamic Upper Face Assessment
Before placing a single mark, evaluate the upper face as a functional system of elevators and depressors. Assess the patient at rest and during maximal frown, maximal brow elevation, a full smile, and natural conversation. Palpate each muscle as it contracts. Lines show where the skin has folded; movement reveals what creates those folds.
During the assessment:
• Evaluate brow height, brow shape, eyelid position, dermatochalasis, pseudoptosis, and compensatory frontalis activity.
• Document baseline asymmetry and discuss it with the patient before treatment.
• Assess the strength, width, and direction of each muscle rather than dosing based on wrinkle count alone.
• Determine how much movement the patient wants to preserve.
• Review previous neuromodulator treatments and evaluate the patient’s response.
• Map the intended effect of every injection point and identify the structures you need to protect.
- THE GLABELLAR COMPLEX: WHY A CONSERVATIVE STARTING DOSE MAY BE APPROPRIATE
The FDA approved BOTOX Cosmetic dose for the glabellar complex is 20 Units divided across five injection sites. The labeled pattern includes one injection into the procerus and two injections into each corrugator.
That is the on label framework, but it does not have to be the automatic starting point for every patient.
Based on the clinical framework Lindsay Olyha, CRNP teaches at Aesthetic Pro Academy, treatment of the glabellar complex often begins around 12 Units using a three point technique. This generally includes one injection targeting the procerus and one injection targeting the origin of each corrugator.
If the patient’s muscle strength, remaining movement, clinical response, or treatment goals indicate that additional treatment is appropriate, the dose can be increased toward 20 Units.
Starting conservatively gives the injector room to evaluate the patient’s individual response. Additional units can be administered when they are clinically indicated, but units that have already been injected cannot be removed.
The Anatomy Behind The Three Point Technique
The three-point approach draws on the anatomy-based research of Sebastian Cotofana, MD, PhD, and his colleagues.
Their 2021 clinical study evaluated a refined three point glabellar injection technique in 105 patients. Instead of treating both the medial and lateral portions of each corrugator with a traditional five point pattern, the technique repositioned the three injection points inferiorly to target the bony origins of the procerus and corrugator supercilii muscles.
The theory is straightforward: weaken the muscle close to its origin on the bone before the fibers fan outward and become more superficial.
This approach can create an effective treatment while avoiding additional toxin placement above the eyebrow, where diffusion or unintended weakening of nearby frontalis fibers could alter brow position.
In the Cotofana study, the refined three point technique produced effects lasting up to four months. The study reported no eyebrow ptosis, upper eyelid ptosis, medial brow ptosis, or lateral frontalis hyperactivity within the study population.
This does not mean the technique eliminates risk or that three injection points are appropriate for every patient. It supports the larger principle that understanding muscular origin and three dimensional anatomy can safely change the traditional injection map.
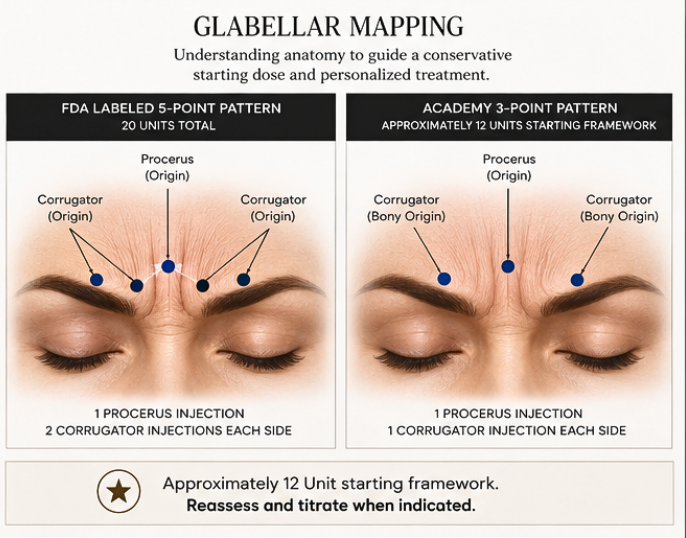
When using an anatomy led glabellar approach:
• Ask the patient to frown and palpate the corrugator origin instead of marking points according to a memorized distance.
• Keep the procerus injection anatomically low enough to avoid unnecessary weakening of the medial frontalis.
• Treat the corrugator origin intentionally and understand the appropriate injection depth and needle direction.
• Reassess the patient after the neuromodulator has reached full onset.
• Add additional units when the patient’s remaining movement, muscle strength, and goals support it.
Academy clinical pearl: The FDA approved glabellar regimen is 20 Units across five injection sites. An approximately 12 Unit, three point approach is an individualized clinical framework and may be considered off label depending on the specific pattern and dosing used.
- THE FRONTALIS: SMALLER DOSES PER POINT WITH A PATTERN DETERMINED BY MOVEMENT
The FDA approved forehead line regimen uses 20 Units divided across five frontalis injection sites, with 4 Units administered at each site.
The labeled forehead treatment is performed with 20 Units in the glabellar complex for a combined upper face dose of 40 Units.
The assessment led approach taught at Aesthetic Pro Academy typically uses 2 Units per frontalis injection point rather than 4 Units. This allows the dose to be distributed across the patient’s actual area of movement while preserving brow support more intentionally.
There is no single frontalis pattern that fits every patient.
A straight or staggered row may appropriately follow one patient’s frontalis activity. Another patient’s anatomy and movement may be better treated with a zigzag pattern.
The injection pattern should follow the moving frontalis muscle. It should not be selected simply because perfectly even injection marks look better in a photograph.
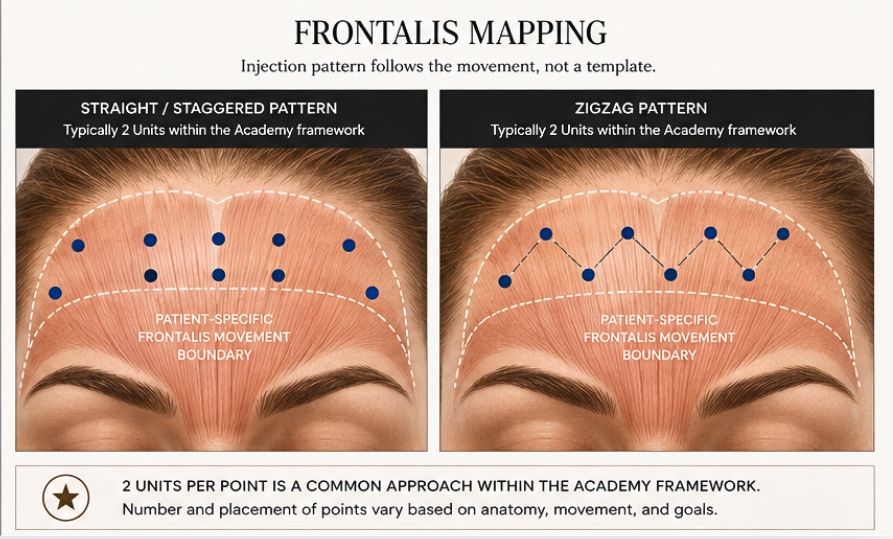
When mapping the frontalis:
• Ask the patient to maximally elevate the brows.
• Observe the patient again during relaxed facial expression and natural conversation.
• Identify the inferior boundary where weakening the frontalis could compromise necessary brow support.
• Use smaller 2 Unit injection points to create a customized distribution across the active muscle when clinically appropriate.
• Adjust the number and position of the points according to forehead height, muscle strength, movement, and asymmetry.
• Avoid chasing every low forehead crease. A crease may be visible below the area that can be safely weakened.
• Assess and treat the glabellar depressors as part of the same upper face balance.
Academy Clinical Pearl: The frontalis is the only brow elevator. More toxin does not automatically create a better result. Preserving appropriate movement can prevent heaviness and help maintain a natural brow position.
- CROW’S FEET: WHY FOUR OR FIVE POINTS PER SIDE MAY CREATE BETTER DISTRIBUTION
The FDA approved BOTOX Cosmetic pattern for lateral canthal lines uses three injection points per side, with 4 Units administered at each point. This creates a total labeled dose of 24 Units.
In clinical practice, three injection points may not always provide the best distribution.
Lateral orbicularis oculi activity often extends across a broader or more complex fan than three concentrated injection points can adequately address.
Based on the techniques Lindsay, CRNP teaches at Aesthetic Pro Academy, four or five smaller dose injection points per side are often used to create a more customized distribution.
Using more injection points does not necessarily mean using more total toxin. It allows the treatment to be distributed across the patient’s actual movement pattern instead of concentrating the dose in only three locations.
The final pattern may arc superiorly, laterally, inferiorly, or in a combination of directions depending on the patient’s smile and orbicularis oculi activity.
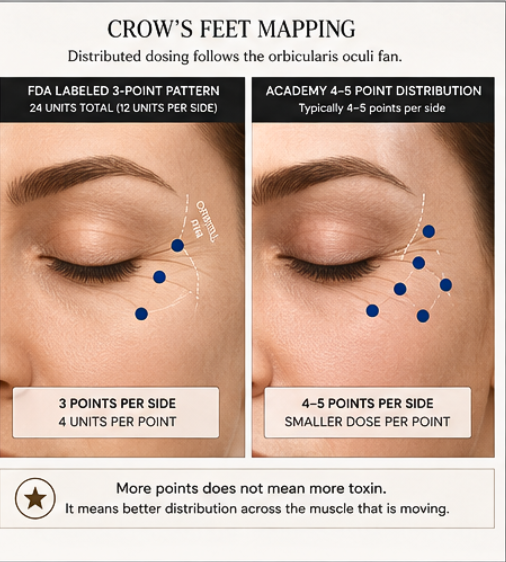
When mapping lateral canthal lines:
• Assess the patient during a full, natural smile, not only a forced squint.
• Palpate and mark the orbital rim before placing the injection points.
• Follow the active lateral orbicularis oculi fibers.
• Consider lower eyelid function, baseline laxity, smile dynamics, and previous treatments.
• Use smaller, distributed aliquots when the patient’s movement requires four or five injection points.
• Do not assume that using more injection sites should increase the total dose.
Academy Clinical Pearl: The goal is not to count visible lines and place an injection beside each one. The goal is to understand the width and direction of the muscle contraction creating those lines.
- INCORPORATING A CHEMICAL BROW LIFT
The upper face assessment should also determine whether the patient is an appropriate candidate for a chemical brow lift.
The goal is not to inject around the brow indiscriminately. The goal is to reduce selected depressor activity, often within the superolateral orbicularis oculi, so the untreated lateral frontalis can exert relatively greater elevation.
A chemical brow lift must be planned within the context of the entire upper face treatment.
If the frontalis has been overdosed, adding treatment to a lateral brow depressor will not reliably correct the resulting imbalance.
Baseline brow asymmetry, eyelid laxity, dry eye symptoms, previous surgery, frontalis strength, and the patient’s smile mechanics may also affect whether this technique is appropriate.
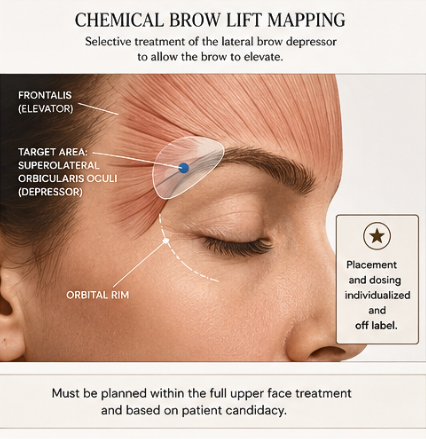
Show the lateral brow and the specific depressor target used within the Academy treatment protocol. Include the orbital rim, the patient’s baseline lateral brow position, and a note explaining that placement and dosing are individualized and off label.
When planning a chemical brow lift:
• Assess brow position at rest and during maximal elevation.
• Evaluate baseline asymmetry before treatment.
• Preserve the lateral frontalis function needed to elevate the brow.
• Identify the intended depressor target and surrounding structures before injecting.
• Plan the brow lift in relation to the glabellar, frontalis, and crow’s feet treatment.
• Set realistic expectations. A chemical brow lift creates a subtle result that depends heavily on the patient’s baseline anatomy.
Labeled Dosing Versus The Aesthetic Pro Academy Framework
Glabellar Complex
FDA labeled pattern: 20 Units across five injection points.
Academy framework: Treatment often begins around 12 Units using three injection points and is titrated when indicated.
What determines the treatment: Muscle strength, corrugator and procerus anatomy, previous response, remaining movement, and patient goals.
Frontalis
FDA labeled pattern: 20 Units across five injection points, with 4 Units per point, administered with 20 Units in the glabellar complex.
Academy framework: Treatment often uses 2 Units per injection point. The number and position of the points vary.
What determines the treatment: Forehead height, direction of movement, muscle strength, brow position, compensatory activity, and desired movement.
Crow’s Feet
FDA labeled pattern: 24 Units total using three injection points per side.
Academy framework: Treatment often uses four or five smaller dose points per side.
What determines the treatment: The width and direction of orbicularis oculi activity, lower eyelid function, smile dynamics, and patient goals.
Chemical Brow Lift
FDA labeled pattern: A chemical brow lift is not an FDA approved cosmetic indication for BOTOX Cosmetic.
Academy framework: Selective and individualized treatment of the appropriate brow depressor.
What determines the treatment: Brow position, brow asymmetry, frontalis balance, orbicularis activity, eyelid anatomy, and patient candidacy.
What New Injectors Need to Understand
The lesson is not that the label is wrong or that every injector should use the exact doses discussed in this article.
The label provides a researched and validated foundation. Clinical practice requires injectors to apply that foundation to the anatomy in front of them.
A thoughtful injector should be able to explain why a treatment differs from the labeled pattern, what anatomical principle or evidence supports that change, and how the patient will be reassessed.
New injectors should:
• Know the on label dose and injection pattern before choosing to depart from it.
• Map the moving muscle, not only the visible wrinkle.
• Use the lowest effective dose that meets the patient’s goals while preserving necessary function.
• Treat the upper face as a balance between elevators and depressors.
• Understand that more injection points do not automatically require more total toxin.
• Document the assessment, planned dose, injection sites, informed consent, and follow up findings.
• Recognize when a technique or indication is off label.
• Stop and seek experienced supervision when the anatomy or appropriate treatment plan is unclear.
Conclusion
Upper face mapping should be repeatable, but it should never be robotic.
Learn the labeled framework. Study the anatomy underneath it. Then allow the patient’s movement to determine the final map.
Whether the treatment includes three injection points in the glabellar complex, 2 Unit points across the frontalis, four or five points around the lateral eye, or a carefully planned chemical brow lift, every injection point has to earn its place.
The Aesthetic Pro Academy Beginner Injectors Training Bundle teaches the anatomy, consultation process, facial assessment, mapping, dosing decisions, safety principles, and complication prevention that allow injectors to move beyond memorized patterns and begin developing true clinical reasoning. Tap down below to learn more.
start Training with aesthetic pro academy
Take the Next Step


Hide